Tuesday 12 July 2011
Ubuntu Backup/Restoration of Installed Apps
1. Install aptoncd software from http://aptoncd.sourceforge.net/
Use terminal to install this software by running this command.
$ sudo apt-get install aptoncd
APTonCD:
This software is used to make .iso file of updates/resperonities/softwares/dependencies of ubuntu which you have downloaded from internet OR installed using terminal OR installed using synaptic package manager OR installed using Ubuntu software center via INTERNET.
2.Now,whenever you install updates/resperonities/softwares/dependencies of ubuntu ....Before you shut down your computer JUST run APTonCD from System->Administration->APTonCD...than
2.(A).click on 'Create' than you will see the list of packages which you have downloaded from internet. You can add .deb packages by click on ‘Add’..
2.(B).Now click on 'Burn' ..Then select ur medium and select destination folder where .iso file will be saved....than unmark metapackage option and do not change other option and click on 'Apply'.
2.(C)Now,.iso file will be saved and APTonCD will ask for burning this .iso file to CD/DVD
But....say ‘NO/CANCLE'....because why waste CD/DVD for it??...I have solution ...
3. Install 'Furius ISO mount' software from Ubuntu software center.
Furius ISO mount:
This software is used to mount .iso and other disk image files like PowerISO and Deamon tools in Windows OS.
4. Now, Run Furius ISO mount from Applications-> Accessories.
5. Mount atponcd-********.iso file where you saved it using Furius ISO mount.
Here *******=YYYYMMDD(Date when you create .iso file).
6. Now,Copy all .deb files to specific folder from Package folder of Mounted .iso file.
7. Unmount that .iso file.
8. Whenever your ubuntu crashed, after reinstalling ubuntu,,,Paste that folder which contain all .deb files to Desktop.
Now....Run Terminal and type
$ cd Desktop
~/Desktop$ cd [folder name]
now...type 'sudo dpkg -i *.deb' without quoets....
Here * is wild card which runs files having .deb extension...
Complete....Your all .deb files will be installed.........UR softwares will be back....
This is tested by me on Ubuntu 10.10,,,
Benefit:You can take all .debs on Pen drive and give to your friend....
Sunday 10 July 2011
Android apps for India
- Banking Apps: ICICI Bank iMobile [Market Link]
- Cricket Apps: Cricbuzz [Market Link], CricInfo [Market Link], Cricketnext [Market Link], NDTVCricket [Market Link]
- News Apps: TOI epaper [Market Link], NDTV [Market Link], IBNlive for Android [Market Link], TaazzaGO for India [Market Link]
- Stock Apps: Moneycontrol [Market Link], BSE / NSE Stock Markets Live [Market Link]
- Entertainment Apps: Bollywood Hungama [Market Link], BollywoodJi [Market Link]
- Shopping Apps: Unofficial Flipkart Browser [Market Link], ngpay [Market Link]
- Navigation Apps: nDrive Maps for India [Market Link], MapmyIndia [not in market, separately available]
- Food Apps: Zomato [Market Link]
- SMS Apps: 160by2 [Market Link]
- Utilities Apps: AutoMeterFare for India [Market Link], Fare Meter [Market Link], Tuk Tuk Meter [Market Link]
[How to] Solve Brightness problem in ubuntu
If you are facing brightness adjustment problem on you laptop like you can not adjust your laptop brightness using fn keys then try following one...
1. In a terminal window, type in:
(the mousepad application will open if doesnt then install it first)
2. Copy and paste the following into the mousepad application that just opened:
3. Save the file: 4. Back in the terminal window, type in the following: (enter your password when prompted).
5. Enter the following into the terminal window: (mousepad will open again) and before the exit 0 line, type in the following: so it looks like:
Restart your computer. and done..
1. In a terminal window, type in:
Code:
mousepad ./backlight_d.sh
2. Copy and paste the following into the mousepad application that just opened:
Quote:
| #!/bin/bash old_b=9; declare -i curr_b=240; declare -i target_b=240; while : ; do b=`cat /sys/class/backlight/acpi_video0/brightness`; delay="0.5" if [ $old_b != $b ]; then old_b=$b let "target_b=$b * 20 + 12" #printf "Target: %10d\n" $target_b fi hex_b="."; if [ "$curr_b" -lt "$target_b" ] ; then let "curr_b=$curr_b + 2" if [ "$curr_b" -gt "$target_b" ] ; then let "curr_b=$target_b" fi hex_b="-" elif [ "$curr_b" -gt "$target_b" ] ; then let "curr_b=$curr_b - 2" if [ "$curr_b" -lt "$target_b" ] ; then let "curr_b=$target_b" fi hex_b="-" fi if [ $hex_b != "." ] ; then hex_b=`printf "%02X" $curr_b` delay="0.005" setpci -s 00:02.0 F4.B=$hex_b fi sleep $delay done |
Code:
File->Save(save it through closing it)
Code:
sudo cp ./backlight_d.sh /etc/ && sudo chmod +x /etc/backlight_d.sh
5. Enter the following into the terminal window:
Code:
sudo mousepad /etc/rc.local
Code:
nohup /etc/backlight_d.sh &
Quote:
| nohup /etc/backlight_d.sh & exit 0 |
How To Display Network Upload / Download Speed On The Panel In Ubuntu 11.04
Indicator-Sysmonitor (System Monitor Indicator) is a really interesting Ubuntu indicator because it allows you to display pretty much anything on the Unity (or GNOME) panel by using a simple command or a bash script.
(Speaking of Indicator-Sysmonitor: a recent update brought sensors support (make sure you install hddtemp and lm-sensors), but this post isn't about that)
Currently there is no AppIndicator to display the actual network usage as in the actual values on the Unity panel in Ubuntu 11.04. We have Indicator Multiload but it only displays a graph so I wrote a script for Indicator-Sysmonitor to display the network upload/download speed as well as CPU and Memory usage (Indicator Sysmonitor already has CPU and Memory usage but if you want to use a script, you must get your script to display the CPU and Memory usage independently).

Getting Indicator-Sysmonitor to display network upload / download speed
Before getting started, please note that while this worked just fine on my computer,
1. Firstly, install Indicator-Sysmonitor. For Ubuntu 11.04:
sudo add-apt-repository ppa:alexeftimie/ppa
sudo apt-get update
sudo apt-get install indicator-sysmonitor
If you use Ubuntu 10.10 (not working in Ubuntu 10.04!), download .deb from here.
2. Install dstat (this is required by my script):
sudo apt-get install dstat3. Now you must download the script. Let's create a folder (if it doesn't exists already) called "scripts" in your home directory and download the script there:
mkdir -p ~/scripts && cd ~/scripts
wget http://webupd8.googlecode.com/files/sysmon_0.2.tar.gz && tar -xvf sysmon_0.2.tar.gz
4. Setting Up System Monitor Indicator to use the script.
Now open Indicator-Sysmonitor (it should show up as System Monitor Indicator in the menu), then click it on the panel and select "Preferences" and under "Use this command", enter this:
$HOME/scripts/sysmon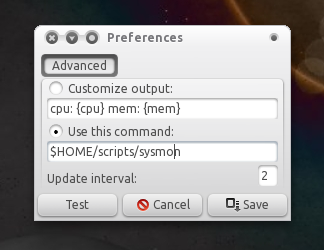
Then save. For me, each time I save the Indicator-Sysmon preferences, the applet freezes. If that's the case for you too, run this in a terminal:
killall indicator-sysmonitorThen start it again.
4. Configuring the script

By default, the script displays the RAM and network usage. You can also display the CPU usage or any other combination (display the network usage only, display all: the CPU, ram and network, etc.). For this, open the script (run the following command in a terminal):
gedit ~/scripts/sysmonAnd on top of the file you'll see something like this:
#settings:
netspeed=true
ram=true
cpu=false
What these do is pretty much obvious - change the items you want to be displayed on the panel to true and the rest to false. Feel free to tweak the script to display other stuff if you want.
Subscribe to:
Posts (Atom)